Download Guide for Computers, iOS & Android Device Users
To download your audio files to a PC computer or a Mac computer, simply use the download links provided in your order confirmation email or download page.
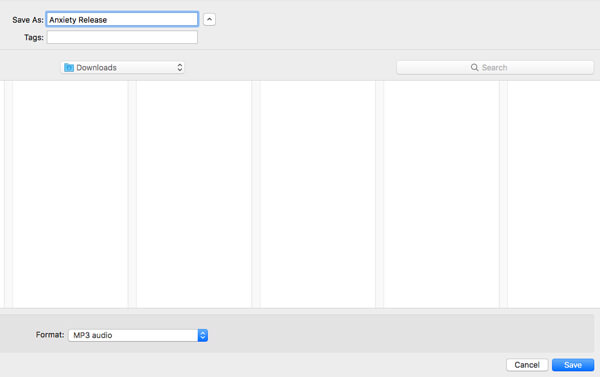
When you click a download link, a box will pop up, like the one featured and prompt you to save the file to your computer.
Choose where on your computer you would like to save your file and click ‘save’.
Once you have download all your music files to your computer, you can then transfer them to iTunes, Windows Media Player, or any other player you use.
You can then connect your phone or tablet to your computer to transfer the files over if you want them on another device. You can also burn a CD if you like.
If you find that when you click on the download link inside your email or inside your account that the file opens and plays in your browser window, simply “right-click and save as” to save the file to your computer, or click the download symbol next to the player, as seen in the screenshot below (right-hand side):

How to Download .mp3 Files to an Android Phone/Tablet
Android devices respond in pretty much the same way desktop computers do, and there shouldn’t be a problem downloading an .mp3 file to an Android phone or tablet.
On most Android devices the download will begin automatically and you will not need to choose a download folder destination.
If you download the file to your Android device and can’t find the file on your device, it’s probably because you haven’t got a file manager installed.
A file manager is an app that helps manage your files. Inside the file manager you can access your music, videos, PDF files and other media. If you need a file manager app, try ES File Manager or File Commander for Android.
How to Download .mp3 files to an iPhone or iPad
iOS mobile devices like the iPad and iPhone don’t allow .mp3 music file downloads (by default) from the browser into iTunes (unlike Android devices which have no such restriction).
So you may need to download the files to your computer first. There is a step-by-step guide on how to do that below.
However, if you don’t have access to a computer and you don’t mind installing an app, you can use an app called Aloha. Many of our customers use this app and it’s available for iPhone and iPad.
This app enables you to download .mp3 music files to your iOS device and bypass the default restriction you will face when using Safari or Google Chrome.
If you’re app savvy, you can Click Here to download Aloha for iPhone/iPad and most likely get started without any instructions.
Generally, we advise that iPhone and iPad users download the files to a computer first, and then transfer the music to their device. Doing so means that you can add the music to your computer’s iTunes library and then add it to your iPhone or iPad’s iTunes library too.
To do this, please follow the instructions below:
Step 1:
First download the files to your desktop or laptop computer (Mac or PC).
Step 2:
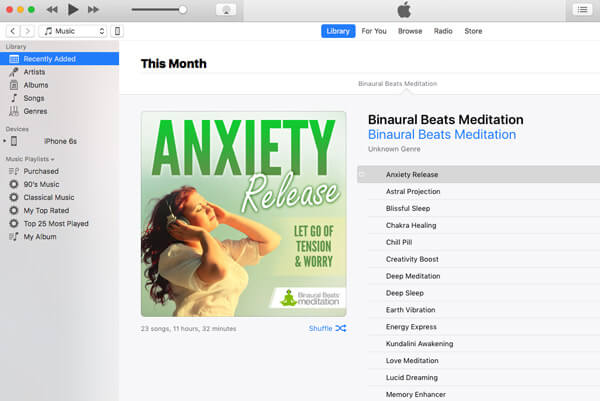
Once downloaded, locate the file(s) on your computer and drag and drop them into iTunes. You can also do a “two-finger-tap on your mouse pad”, or “right-click” on your mouse and select to open with iTunes”
If you use a Mac, you can just pull the file onto the icon of the iTunes program in the task bar at the bottom of the screen and it will be added to the library. You will find the file you added under the ‘recently added’ section in iTunes.
Step 3:
Once the files you want to transfer to your iPhone or iPad are loaded into iTunes, connect your iPad/iPhone to your computer via the transfer cable (usually this is just your charger cable with a USB connection on one end).
Step 4:
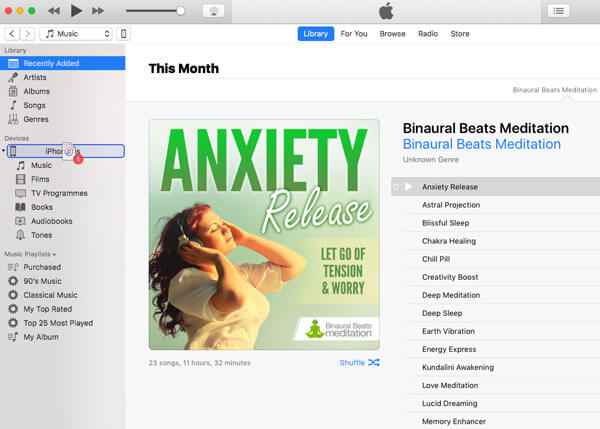
You will then see the icon of your iPhone or iPad appear in iTunes (see under devices). This shows you that your device is connected.
You can now drag and drop the tracks you want to load onto your iPhone or iPad onto the image of your device (in the device window), just as you would when normally transferring music to your iPad/iPhone.
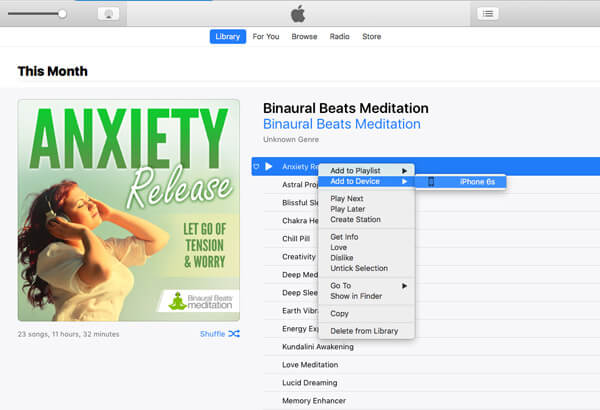
Instead of dragging and dropping, you can also do a “two-finger-tap on your mouse pad”, or “right-click” on your mouse, and choose to add to your device too.
When you disconnect your device, your music will be on available on your iPhone or iPad.
Note for iCloud Users:
Some iPhone 7 users have noted that iTunes won’t let them either drag and drop the music into iTunes and transfer to their phone.
The reason for this is that you are most likely a member of Apple Music or iTunes Match, and this means iTunes automatically manages your music library and by default you have iCloud Music Library turned on.
When you have iCloud Music Library turned on, you can’t manually manage music.
If you find that this is the case, turn this setting off on your phone by going to [settings|music|iCloud music library] before you plug it into your computer. Once you plug your phone in, you will be able to add the music to iTunes, and then to your phone, from Finder with no issues.
There is also an Apple tutorial you can look at. It also has screenshots showing how to transfer music from iTunes to your device. Find it here on the Apple support site.


